서론
안녕하세요. 최근에 저는 신입사원으로 안드로이드 개발을 시작했습니다.
회사에서는 가장 먼저 진행하게 된 것은 ACCESSIBILITY 작업을 맡아서 진행을 하고 있고, 조금 더 잘 사용하기 위해서 해당 기술들을 정리해서 쉽게 사용할 수 있게 하려고 블로그 글을 작성하고 있습니다.
ACCESSIBILITY는 시력이 불편하신 분들이 talkback이라는 안드로이드에서 스크린을 읽어주는 스크린리더 기능을 잘 활용할 수 있도록 각종 스크린 값들을 지정하는 것을 말합니다.
0. 백문이불여일도큐먼트
앱 접근성 향상 원칙 | Android 개발자 | Android Developers
Android 기기를 사용하는 일부 사용자는 여타 사용자와는 다른 접근성 기능을 필요로 합니다. 동일한 접근성 기능을 필요로 하는 특정 사용자 그룹을 지원하기 위해 Android 프레임워크는 개발자가
developer.android.com
Focus 편
안드로이드의 접근성 작업은 크게 두 가지를 알면, 어느 정도 문제들을 해결할 수 있을 것이라고 생각을 합니다. 그 두 가지는 Focus와 HintMessage입니다. 그 중에 Focus는 talkback을 사용하는 사용자에게 어떤 뷰를 읽어야하는 지, 가르키는 것을 의미합니다.
Focus의 문제들은 'Focus를 하나로 합쳐주세요.', 'Focus를 나누어 주세요.', 'Focus를 막아주세요.', 'Focus를 이동시켜주세요.', 'Focus를 제거해주세요.'와 같은 작업들이라고 생각을 한다.
Focus-1. Label For는 다른 뷰의 contentDescription을 활용할 수 있다!
label for는 여러 개의 뷰가 있을 때, A의 뷰에서 B의 뷰에 대한 내용이 필요할 때 사용하는 것 입니다.
아래에 대한 코드를 통해서 자세히 알아보도록 하겠습니다.
 <TextView
            android:id="@+id/username_textview"
            android:layout_width="0dp"
            android:layout_height="wrap_content"
            android:layout_weight="2"
            android:gravity="center"
            android:labelFor="@id/username_edittext"
            android:text="새우버거"
            app:layout_constraintStart_toStartOf="parent"
            app:layout_constraintTop_toTopOf="parent" />

<EditText
            android:id="@+id/username_edittext"
            android:layout_width="0dp"
            android:layout_height="wrap_content"
            android:layout_weight="2"
            android:hint="input username"
            app:layout_constraintStart_toStartOf="parent"
            app:layout_constraintTop_toTopOf="parent" />
TextView에 labelFor를 등록해서 EditText의 id를 등록하게 되면, TextView에 있는 내용이 EditText로 전달되게 됩니다.
EditText의 input username이 발화 후에, TextView의 user가 발화됩니다.

(input username 입력창) + (새우버거) 가 발화되어 두 가지의 라벨이 이어지게 됩니다.
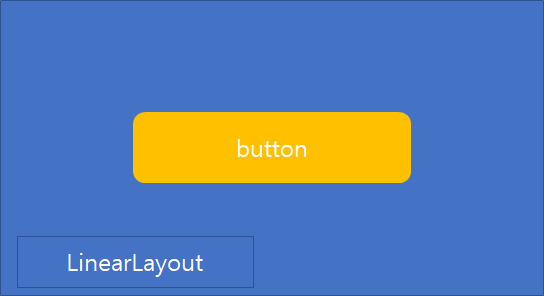
Focus-2. Focusable을 통해서 focus를 합치거나 나누자!
여러 개의 talkback 포커스를 하나로 묶기 위해서는 xml 상에서 focusable을 계층 지어 하나로 합쳐주면 이를 해결할 수 있습니다. 말 뜻이 어렵지만, 아래의 코드처럼 컨테이너의 역할을 하는 LinearLayout은 focusable을 true로 하고, 하위 역할을 하는 뷰는 false로 줍니다.
 <LinearLayout
        android:layout_width="match_parent"
        android:layout_height="wrap_content"
        android:focusable="true">

        <TextView
            android:layout_width="0dp"
            android:layout_height="wrap_content"
            android:layout_weight="1"
            android:focusable="false"
            android:importantForAccessibility="no"
            android:text="label(O)">

        </TextView>

        <TextView
            android:id="@+id/username_textview"
            android:layout_width="0dp"
            android:layout_height="wrap_content"
            android:layout_weight="2"
            android:focusable="false"
            android:gravity="center"
            android:labelFor="@id/username_edittext"
            android:text="새우버거"
            app:layout_constraintStart_toStartOf="parent"
            app:layout_constraintTop_toTopOf="parent" />

        <EditText
            android:id="@+id/username_edittext"
            android:layout_width="0dp"
            android:layout_height="wrap_content"
            android:layout_weight="2"
            android:focusable="false"
            android:hint="input username"
            app:layout_constraintStart_toStartOf="parent"
            app:layout_constraintTop_toTopOf="parent" />
    </LinearLayout>
뷰 자체가 focus를 갖지 않다보니까, 기존의 talkback이 해당 뷰에 접근을 하지 못 하는 현상이 일어난다. 그래서 해당 focus는 컨테이너 뷰가 갖게 되므로, talkback의 스코프가 하나로 합쳐지게 된다. 이를 이용하게 되면, 거꾸로 focus를 잘게잘게 나누는 것까지 가능하기 때문에 focusable을 통해서 focus를 관리할 수 있다는 사실에 명심을 하고 작업을 진행하면 많은 것이 수월하게 풀릴 수 있다.


Focus-3. Foucs를 막기 위해서는 android:importantForAccessibility를 사용해라!
작업을 진행하다보면, talkback을 통해서 읽지 말아야하는 뷰들이 있습니다다. 예를 들면, 단순한 이미지 아이콘이 이와 같은 경우라고 생각을 합니다. 이러한 뷰에게 포커스를 막기 위해서는 xml에서 android:importantForAccessibility의 값을 no로 지정시켜 해당 뷰를 읽지 않도록 레이아웃을 제공할 수 있습니다.
<TextView
android:layout_width="0dp"
android:layout_height="wrap_content"
android:layout_weight="1"
android:focusable="false"
android:importantForAccessibility="no"
android:text="label(O)">
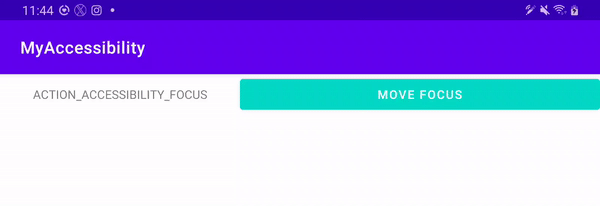
</TextView>Focus-4. Focus를 이동 및 제거 시켜주세요.
안드로이드에서는 화면을 덮는 동작의 레이아웃들이 많습니다. 다이얼로그, 네비게이션드로어, 커스텀 뷰와 같이 다양한 형태의 뷰들이 화면을 덮게 되는데, 이 때 대부분의 talkback은 클릭했던 뷰의 위치에 멈춰 있을 지도 모릅니다. 우리는 이러한 점을 해결하기 위해서 Focus를 이동시키거나 제거하는 법을 배울 것 입니다.
class MoveFocusActivity : AppCompatActivity() {
    var isMovable = true
    override fun onCreate(savedInstanceState: Bundle?) {
        super.onCreate(savedInstanceState)
        val binding = ActivityMoveFocusBinding.inflate(layoutInflater)
        setContentView(binding.root)

        binding.targetButton.setOnClickListener {
            if (isMovable) {
                binding.targetTextview.text = "ACTION_ACCESSIBILITY_FOCUS"
                binding.targetTextview.performAccessibilityAction(AccessibilityNodeInfo.ACTION_ACCESSIBILITY_FOCUS, null)
            } else {
                binding.targetTextview.text = "ACTION_CLEAR_ACCESSIBILITY_FOCUS"
                binding.targetButton.performAccessibilityAction(AccessibilityNodeInfo.ACTION_CLEAR_ACCESSIBILITY_FOCUS, null)
            }
            isMovable = !isMovable
        }
    }
}
- performAccessibilityAction(AccessibilityNodeInfo.ACTION_ACCESSIBILITY_FOCUS, null) : 포커스 이동
- performAccessibilityAction(AccessibilityNodeInfo.ACTION_CLEAR_ACCESSIBILITY_FOCUS, null) : 포커스 제거
Focus-5. Focus를 이동 및 제거 시켜주세요.(2)
Focus를 이동시키기 위한 두 번째 방법은 뷰를 기준으로 sendAccessibilityEvent를 제공하는 것입니다.
binding.targetButton2.setOnClickListener {
	binding.targetTextview2.sendAccessibilityEvent(AccessibilityEvent.TYPE_VIEW_FOCUSED)
}
HintMessage편
Hint-1. 힌트 메시지는 클릭리스너에서 나온다.
클릭하거나 길게 클릭하는 행위의 뷰에서는 talkback이 자동적으로 '두 번 탭하여 활성하하세요.'와 같은 힌트 메시지를 통해서 해당 뷰가 어떤 행동을 갖고 있는 지 알려줍니다. 하지만, 프로젝트에는 클릭리스너는 갖고 있지만, 어떤 행위를 하고 있지 않은 구조의 뷰가 존재할 수 있습니다. 이럴 때, 우리는 힌트메시지를 컨트롤 해줘야합니다.
우선, 앞에서 말한 것처럼 힌트 메시지는 클릭 리스너, 롱클릭리스너와 같이 뷰가 갖고 있는 클릭 리스너에서 힌트 메시지가 발화된다는 것을 알아야합니다.
//클릭리스너로 힌트메시지 추가
binding.target1Button.setOnClickListener {

}

Hint-2. 힌트 메시지를 제거하기 위해서는 removeAction을 활용해라.
힌트 메시지를 제거하는 첫 번쨰 방법은 'removeAction을 사용하는 것' 입니다.
removeAction은 AccessibilityNodeInfo가 갖고 있는 메소드이고, 이것을 가져올 수 있는 방법은 view의 accessibilityDelegate에서 onInitializeAccessibilityNodeInfo를 오버라이드하게 되면, 해당 뷰와 NodeInfo를 얻을 수 있습니다.
그리고, removeAction에서 ACTION_CLICK을 제거시켜주게 되면, 힌트 메시지를 제거할 수 있습니다.
binding.target2Button.accessibilityDelegate = object : View.AccessibilityDelegate() {
	override fun onInitializeAccessibilityNodeInfo(
		host: View?,
        info: AccessibilityNodeInfo?
        ) {
        super.onInitializeAccessibilityNodeInfo(host, info)
        info?.removeAction(AccessibilityNodeInfo.ACTION_CLICK)
        host?.isClickable = false
	}
}
해당 답변이 가장 이상적으로, talkback source에서 왜 'double on tap'이라는 힌트 메시지가 어떤 이유에 의해서 나오는 지에 대한 답변과 함께, 이를 제거하는 좋은 답변 중 하나라고 생각합니다.
How do it disable message "double on tap" in view using talkback accessibility android?
When a view has event click and enable talkback. I need to disable the audio "double to tap" in the view. I am using accessibility in android development. How can I do this, please?
stackoverflow.com
Hint-3. 힌트메시지를 제거하고, 순수하게 뷰의 콘텐츠를 얻어오기 위해서는 뷰를 감싸는 레이아웃을 고민해보자.
버튼에는 2가지 힌트메시지가 있습니다. 첫 번째로는 '~버튼'이라는 키워드가 자동적으로 붙고, 두 번째로는 '실행하려면 두 번 누르세요.'라는 힌트메시지가 나오게 됩니다. 하지만, 우리는 작업을 하다보면 순수하게 뷰의 contentDescription만 얻어오고 싶을 때가 있는데, 이럴 때는 뷰를 감싸는 레이아웃을 배치해서 해당 문제를 해결할 수 있습니다.
이렇게 했을 때, 얻는 다른 이점은 Hint-2에서는 뷰에 removeAction과 isClickable을 막게되는데, 이게 정석적인 방법이 아니기 때문에, 해당 레이아웃을 통해서 힌트 메시지를 얻어오거나 수정하는 문제를 깔끔하게 해결할 수 있습니다.
<LinearLayout
        android:layout_width="match_parent"
        android:layout_height="wrap_content">

        <TextView
            android:id="@+id/target_3_textview"
            android:layout_width="0dp"
            android:layout_height="wrap_content"
            android:layout_weight="2"
            android:text="DISABLE double on tap2"
            android:focusable="true"
            android:gravity="center"
            android:importantForAccessibility="no">

        </TextView>

        <LinearLayout
            android:layout_width="0dp"
            android:layout_height="wrap_content"
            android:layout_weight="3"
            android:focusable="true">
            <Button
                android:id="@+id/target_3_button"
                android:layout_width="match_parent"
                android:layout_height="wrap_content"
                android:text="DISABLE HINT MESSAGE"
                android:importantForAccessibility="no"
                android:backgroundTint="@color/teal_200"
                />
        </LinearLayout>

</LinearLayout>
Hint-4. 힌트 메시지를 수정해서 사용자에게 다양한 상태를 알려줄 수 있다.
'두 번 탭하여 활성화해주세요.'와 같은 힌트메시지는 수정할 '주문 하려면 두 번 탭하여 활성화해주세요.' , '예약하려면 두 번 탭하여 활성화해주세요.'와 같은 힌트메시지로 수정할 수 있습니다. 수정 하기 위해서는 AccessibilityNodeInfo에서 별도의 action을 추가해주면 됩니다.
binding.target4Button.accessibilityDelegate = object : View.AccessibilityDelegate() {
	override fun onInitializeAccessibilityNodeInfo(
    	host: View?,
		info: AccessibilityNodeInfo?
	) {
		super.onInitializeAccessibilityNodeInfo(host, info)
		val orderAction = AccessibilityNodeInfo.AccessibilityAction(AccessibilityNodeInfo.ACTION_CLICK, "주문")
		info?.addAction(orderAction)
	}
}

접근성이라는 작업을 하면서 느낀 점
어떤 안드로이드 컨퍼런스에서 접근성 작업을 열심히 진행하시고, 이에 대해서 발표를 하시는 발표자님의 모습이 눈에 선합니다. 발표를 들으면서 들었던 생각은 '나도 한 번 해보고 싶다'는 생각이 들었던 영역이었습니다. 그 이유는 앱을 통해서 사회적 약자를 위한 기능을 제공할 수 있으며, 최대한 많은 사람들이 편하게 앱을 사용할 수 있게 고민을 할 수 있는 영역이기 때문입니다. 그래서, 개인 프로젝트에서는 다소 중요시 여기지 않았던 부분이 많았고, 저에게는 작업하는 모든 것들이 새로웠던 영역이었습니다.
Github
빌드 해보시고, 사용해보시길 권장합니다.
hakzzang/ACCESSIBILITY
Android ACCESSIBILITY . Contribute to hakzzang/ACCESSIBILITY development by creating an account on GitHub.
github.com
'Android 공부' 카테고리의 다른 글
| Android 백그라운드 정책 톺아보기 (2) | 2021.12.06 |
|---|---|
| Android RecyclerView에서 OOM 방지하기 (0) | 2019.06.24 |
| 감자튀김의 다시 쓰는 Android MVVM(4) - ViewModel & DataBinding (1) | 2019.04.12 |
| 감자튀김의 다시 쓰는 Android MVVM(3) - Repository (0) | 2019.04.02 |
| 감자튀김의 다시 쓰는 Android MVVM(2) - DI (0) | 2019.03.27 |


